
Artificial intelligence is transforming the world of digital design and 3D printing. Tasks that previously required advanced technical knowledge, specialized software, and hours of manual work can now be completed more efficiently with AI-powered tools. From generating three-dimensional objects using reference images to preparing complex models for printing, modern technology is making 3D creation more accessible to everyone.
Whether you are a beginner, professional designer, game developer, digital artist, or 3D printing enthusiast, AI-powered tools can simplify your creative workflow. You no longer need to build every object manually from scratch. Instead, you can use artificial intelligence to generate an initial 3D model and refine it for your specific project.
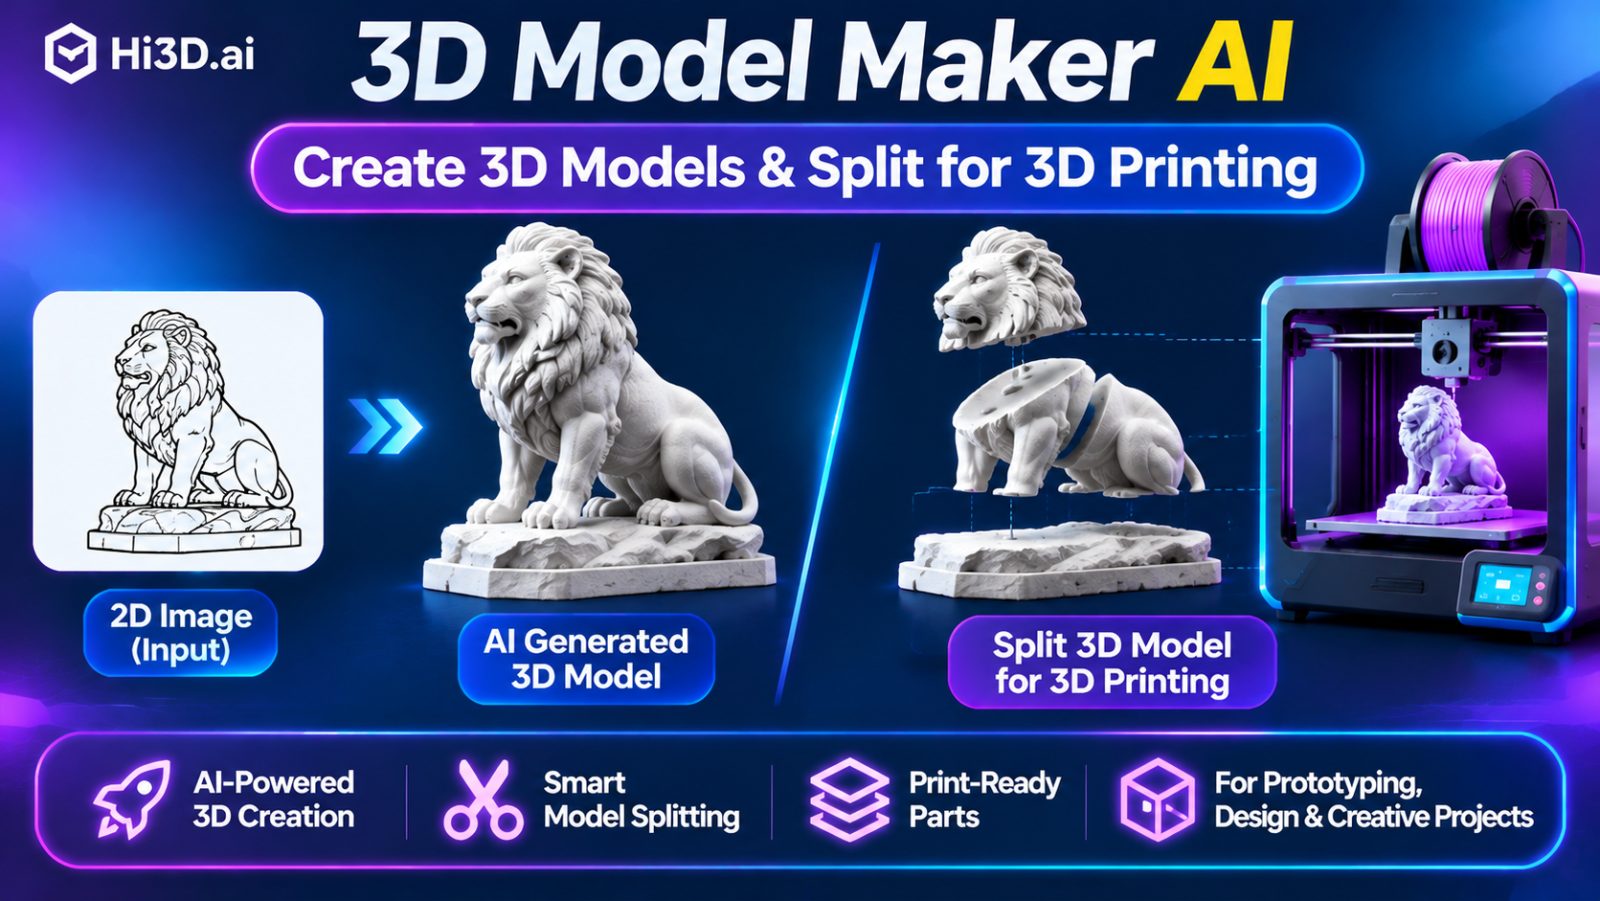
A modern 3d model maker ai offers an accessible way to transform visual ideas and reference images into three-dimensional assets. Platforms like Hi3D help users explore AI-assisted modeling without requiring extensive experience in traditional 3D design.
In this article, we will explore how AI 3D modeling works, its benefits, practical applications, and how to prepare generated models for successful 3D printing.
What Is a 3D Model Maker AI?
A 3D model maker AI is a digital tool that uses artificial intelligence to generate three-dimensional objects from images, text descriptions, or other visual references, depending on the platform's capabilities.
Traditional 3D modeling involves manually creating geometry, adjusting vertices, building surfaces, and refining object dimensions. These processes can be challenging for beginners and time-consuming for experienced designers.
AI-powered modeling tools simplify these activities by analyzing visual information and generating three-dimensional geometry automatically.
For example, a user can upload an image of a shoe, chair, toy, vehicle, or decorative object. The AI system analyzes its visible characteristics and generates a corresponding 3D representation.
The resulting model can then be reviewed, refined, textured, and exported for different creative applications.
How Does AI 3D Model Generation Work?
AI-powered 3D generation generally involves several stages.
1. Upload a Reference Image
The first step is selecting an image of the object you want to transform into a 3D model.
For better results, consider using:
- High-resolution images.
- Clearly visible objects.
- Good lighting and contrast.
- Minimal background distractions.
- Images with recognizable shapes and proportions.
The quality of the reference image can influence the quality of the generated model.
2. AI Image Processing
After uploading the image, the AI system analyzes its visual characteristics. It identifies shapes, edges, proportions, and other details to estimate the object's three-dimensional structure.
3. Automatic 3D Model Creation
The system uses its learned patterns and generation capabilities to create a three-dimensional representation.
Depending on the complexity of the object and the AI technology, the resulting model may require additional refinement.
4. Review and Export
Once the model is generated, users can inspect its geometry, surface details, and proportions.
The model can then be exported in a compatible format, such as GLB, OBJ, FBX, or STL, depending on the platform's supported options.
Benefits of Using an AI 3D Model Maker
AI-powered modeling tools offer several advantages for individuals and businesses.
Faster Model Creation
Traditional modeling can require hours of manual work. AI tools help accelerate the initial creation process by generating geometry from visual references.
Beginner-Friendly Design
People without professional 3D modeling experience can experiment with three-dimensional objects using relatively simple workflows.
Reduced Manual Effort
Automating repetitive modeling tasks allows designers to focus more on creativity, refinement, and project development.
Flexible Creative Applications
AI-generated models can support game development, product visualization, digital artwork, animation, architectural concepts, and 3D printing.
Cost-Effective Experimentation
Accessible AI modeling tools allow users to explore different design concepts without immediately investing in expensive professional workflows. However, available free features and usage limits depend on the platform.
How to Prepare an AI-Generated Model for 3D Printing
Generating a 3D model is only one part of the complete production process. A model intended for 3D printing must also meet specific geometric and structural requirements.
Unlike digital models used only for visualization, printable objects need suitable geometry, dimensions, and physical structure.
Before printing, consider the following requirements:
Watertight Geometry: The model should form a closed surface without unwanted holes or open boundaries.
Correct Scale: Confirm that the object's dimensions match your intended printing size.
Wall Thickness: Ensure that the walls are thick enough for the selected printer, material, and printing settings.
Surface Quality: Inspect the model for unwanted artifacts, irregular geometry, and disconnected components.
Printer Compatibility: Check that the model fits within the printer's available build volume.
These checks help reduce printing failures and improve the final result.
Why Do You Need to Split a 3D Model for Printing?
Sometimes, a generated model is too large or complex to print as a single object. In these situations, dividing it into smaller sections becomes necessary.
Model splitting is the process of separating one 3D object into multiple independent components that can be printed individually and assembled afterward.
For example, a large character model might be divided into a head, body, arms, and legs. Similarly, a large architectural model could be separated into walls, floors, roofs, and other structural components.
Splitting can provide several benefits:
- Overcome printer size limitations: Smaller sections can fit within the printer's build volume.
- Improve print orientation: Individual components can be positioned to achieve better surface quality.
- Reduce support requirements: Strategic splitting may reduce difficult overhangs and unnecessary support structures.
- Simplify transportation: Smaller printed sections are easier to handle and transport.
- Improve assembly flexibility: Separate components can be adjusted, painted, or finished before final assembly.
How to Split 3D Model for 3D Printing
Understanding how to split 3d model for 3d printing is essential when preparing oversized or complicated models for additive manufacturing.
The splitting process involves dividing a model into printable sections while preserving its original shape and ensuring that the individual components can be assembled correctly.
Here is a practical step-by-step approach.
Step 1: Import Your 3D Model
Open your existing model in compatible 3D modeling or splitting software.
Commonly used formats include STL, OBJ, and other supported 3D file types.
Before splitting, inspect the model for geometry problems, unwanted components, and missing surfaces.
Step 2: Identify Suitable Cutting Positions
Determine where the model should be divided.
The cutting locations should consider the object's shape, structural requirements, printing orientation, and final assembly process.
For example:
- A large human figure can be divided into separate body sections.
- A decorative statue can be separated into upper and lower sections.
- A large vehicle model can be divided into individual body components.
- An architectural structure can be divided into floors and structural elements.
Step 3: Apply Cutting Planes
Use the software's cutting or splitting features to define where the model will be separated.
A cutting plane determines the boundary between individual sections. Depending on the software, users may be able to create multiple cutting planes to divide complicated objects.
Step 4: Add Connectors and Alignment Features
For models that require assembly, consider adding alignment pins, sockets, joints, or connecting features.
These features help position the individual sections correctly and can improve assembly stability.
The appropriate connector design depends on the material, object size, printing accuracy, and intended use.
Step 5: Check Every Individual Part
After splitting the model, inspect each section carefully.
Make sure that:
- Every section has printable geometry.
- No unwanted holes or open surfaces remain.
- Connecting areas align correctly.
- The individual parts fit within the printer's build volume.
- The sections can be assembled without unnecessary gaps.
Step 6: Export the Split Components
Export each section separately in a compatible format, such as STL or 3MF, depending on your software.
Import the files into your preferred slicer and configure the printing parameters, including layer height, infill, supports, and print orientation.
Best Practices for Successful 3D Printing
Splitting a model correctly is important, but additional preparation can make the printing process more reliable.
Plan Before Cutting: Identify the best splitting positions before modifying the original model.
Maintain Structural Strength: Avoid creating weak joints or unnecessarily thin connecting sections.
Allow Proper Tolerances: Connectors may require small clearance adjustments depending on printer accuracy and material properties.
Optimize Print Orientation: Position individual components to reduce supports and improve visible surface quality.
Test Small Components: For complicated projects, print a small connector or test section before producing the complete model.
Inspect the Final Assembly: Check alignment, stability, and surface gaps before considering the project complete.
Who Can Benefit from AI Modeling and Model Splitting?
These technologies are useful across several industries.
3D Printing Enthusiasts
Hobbyists can generate creative models using AI and divide large objects into manageable printable components.
Product Designers
Designers can create initial product concepts from images and prepare models for prototyping.
Game Developers
AI-generated models can provide starting assets for characters, props, objects, and digital environments.
Artists and Sculptors
Artists can experiment with digital sculptures, figurines, and decorative objects before producing physical versions.
Students and Educators
Students can explore geometry, digital modeling, and additive manufacturing through practical projects.
Common Mistakes to Avoid
Even with AI-powered tools, certain mistakes can affect the quality of the final model.
- Using low-quality or unclear reference images.
- Ignoring geometry problems in generated models.
- Splitting objects without considering assembly requirements.
- Creating connectors that are too tight or too loose.
- Ignoring printer build-volume limitations.
- Exporting models without checking mesh integrity.
- Failing to test complicated assemblies before final printing.
Careful preparation can help prevent these problems and produce more reliable results.
Conclusion
AI is making 3D modeling faster, easier, and more accessible for creators across different industries. A 3D model maker AI can transform reference images into three-dimensional assets, reducing the need for extensive manual modeling.
However, generating a model is only the beginning. Preparing it for physical production requires additional steps, including geometry inspection, model splitting, connector design, and print optimization.
By combining AI-powered model generation with effective 3D splitting techniques, designers and printing enthusiasts can create more flexible and manageable projects.
Platforms like Hi3D provide useful tools for exploring AI-assisted 3D creation and preparing models for different applications. Whether you are a beginner or an experienced creator, learning these workflows can help turn your digital ideas into practical three-dimensional creations.